> ## Documentation Index
> Fetch the complete documentation index at: https://docs.playtolia.com/llms.txt
> Use this file to discover all available pages before exploring further.
# Installation
> Add the Playtolia SDK to your Unity project with the Package Manager.
Playtolia ships as a **Unity Package Manager (UPM) package** named `com.playtolia.sdk`. It
wraps a cross-platform native library (Android + iOS) and exposes C# APIs. Once the package
resolves, it manages its native dependencies and platform configuration for you.
There are three supported ways to install it — pick whichever fits your workflow:
* **Scoped registry** — the recommended path. Add Playtolia's registry once and the package
behaves like any built-in one: browse it in the Package Manager, install by name, and get a
one-click **Update** button when new versions ship.
* **Git URL** — pull a tagged version straight from the distribution repository. No registry
setup, but updates are a manual tag bump (no Update button).
* **Tarball (`.tgz`)** — a self-contained archive you download once. Good for offline or
air-gapped machines, or when you want the exact bytes checked into your own storage.
All three install the same package into your project's `Packages/` folder, so you can switch
between them later without touching your game code.
### Requirements
* **Unity 6000.0 or later** (developed and tested against `6000.0.32f1`)
* **iOS builds:** [Xcode](https://developer.apple.com/xcode/) and
[CocoaPods](https://cocoapods.org); deployment target **13.0+**
* **Android builds:** Android SDK; **min SDK 24** (Android 7.0)
Firebase is **not** required for the core SDK — auth, billing, social, and the rest work
without it. You only need the [Firebase Unity SDK](https://firebase.google.com/docs/unity/setup)
(with Cloud Messaging) if you enable **Push Notifications**, which is off by default. See
[Push Notifications](/for-unity/push-notifications) for that setup.
## Install with the Package Manager
Open the Package Manager from **Window ▸ Package Manager**. Use the **`+`** button in the
top-left corner to add a package by Git URL or from a tarball. For a tour of the window
itself, see Unity's
[Package Manager window](https://docs.unity3d.com/6000.0/Documentation/Manual/upm-ui.html)
and [Install a package](https://docs.unity3d.com/6000.0/Documentation/Manual/upm-ui-install.html)
guides.
A [scoped registry](https://docs.unity3d.com/6000.0/Documentation/Manual/upm-scoped.html)
tells Unity where to find Playtolia packages. Add it once and every future version — plus
the Package Manager **Update** button — comes for free.
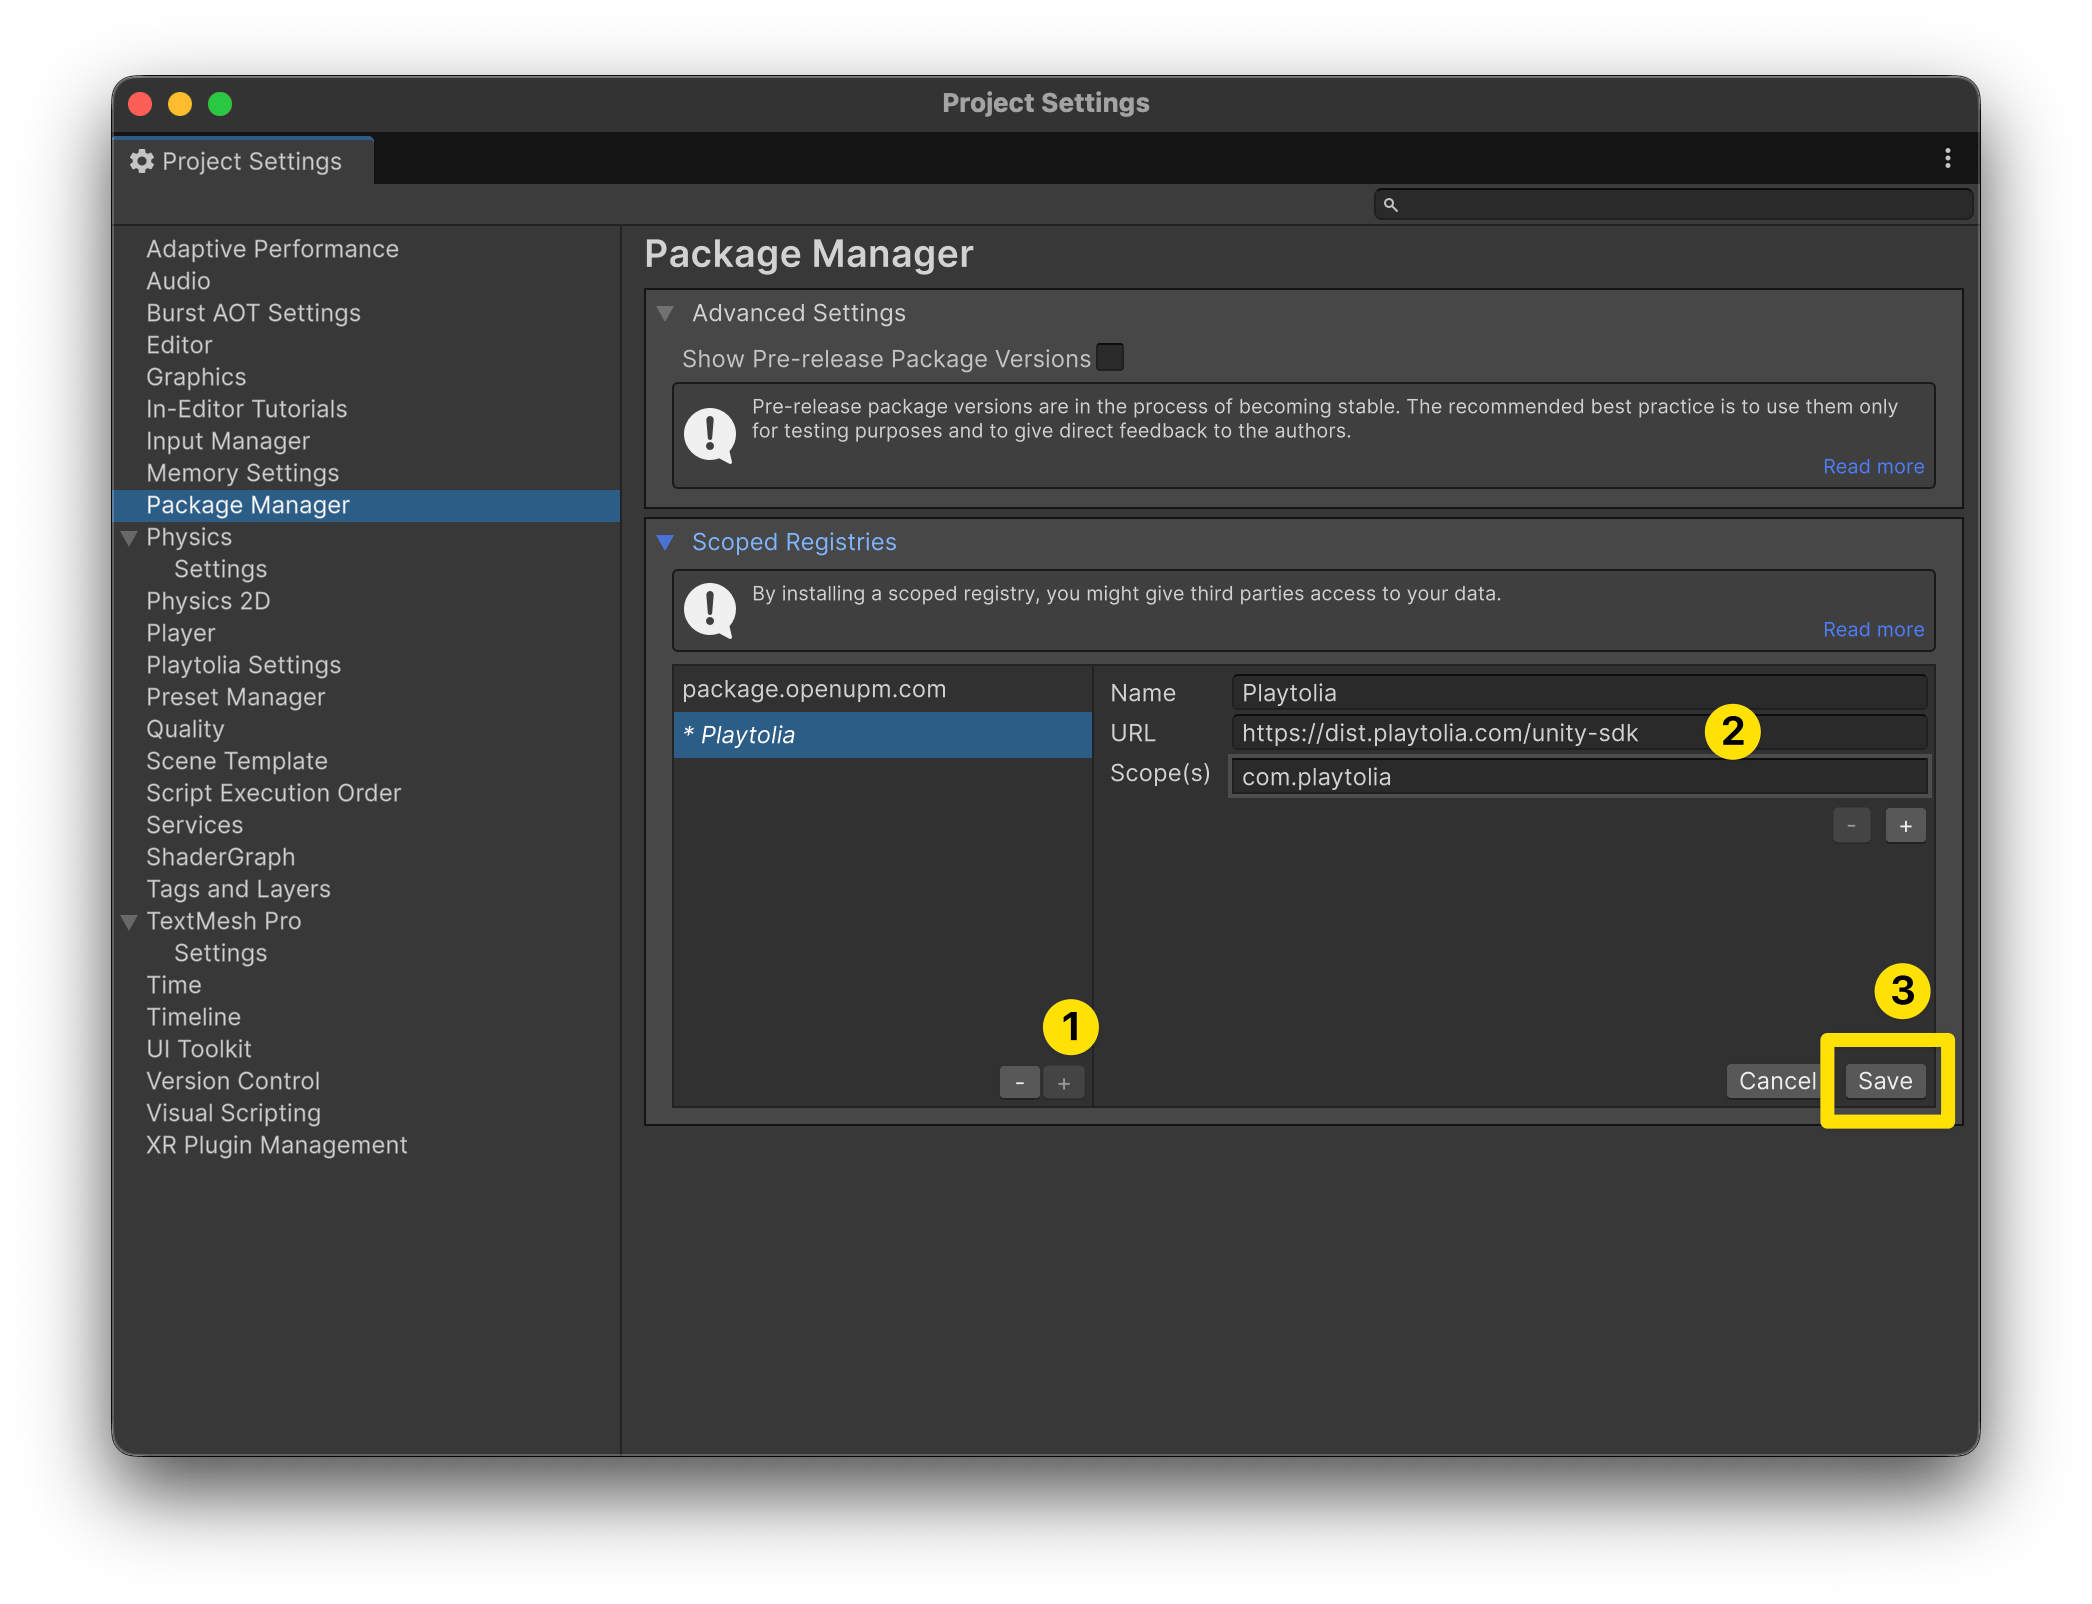
**Add it from Project Settings (no file editing).** Open **Edit ▸ Project Settings ▸
Package Manager**, expand **Scoped Registries**, and:
1. Click the **`+`** button to add a new registry.
2. Fill in the fields exactly:
* **Name** — `Playtolia`
* **URL** — `https://dist.playtolia.com/unity-sdk`
* **Scope(s)** — `com.playtolia`
3. Click **Save**.
 Then install the package: **Window ▸ Package Manager ▸ My Registries ▸ Playtolia ▸
Playtolia SDK ▸ Install** (or **`+` ▸ Add package by name…** → `com.playtolia.sdk`).
Add the same registry and the package to `Packages/manifest.json` (create the
`scopedRegistries` array if it isn't there):
```json theme={null}
{
"scopedRegistries": [
{
"name": "Playtolia",
"url": "https://dist.playtolia.com/unity-sdk",
"scopes": ["com.playtolia"]
}
],
"dependencies": {
"com.playtolia.sdk": "1.4.0"
}
}
```
Unlike a Git URL, a registry dependency uses normal version numbers (`"1.4.0"`), so the
Package Manager shows every available version and an **Update** button when a newer one
is published. This is the smoothest way to stay current. Grab the latest version number
from the [Releases page](https://github.com/Playtolia/unity-sdk/releases).
1. In the Package Manager, click **`+` ▸ Add package from git URL…**
2. Paste the repository URL with the version tag you want and click **Add**:
```
https://github.com/Playtolia/unity-sdk.git#vX.Y.Z
```
Replace `vX.Y.Z` with the version you want — grab the latest tag from the
[Releases page](https://github.com/Playtolia/unity-sdk/releases) (e.g. `#v1.4.0`). Unity
clones that tag and adds it to your project.
**Pin to a tag.** Git URLs don't support version ranges, and the package's C# is matched
to a specific iOS framework and Android (Maven) version — so a fixed `#vX.Y.Z` keeps all
three in sync and builds reproducible. Omitting the fragment resolves `main` at the
moment you add it and then locks that commit in `Packages/packages-lock.json`; it does
**not** auto-update, so a tag is clearer and safer.
You can also add the same line to `Packages/manifest.json` directly:
```json theme={null}
{
"dependencies": {
"com.playtolia.sdk": "https://github.com/Playtolia/unity-sdk.git#vX.Y.Z"
}
}
```
Installing from a Git URL requires a
[Git client](https://git-scm.com/) on your machine and on your `PATH` before you
launch Unity. See Unity's
[Install from a Git URL](https://docs.unity3d.com/6000.0/Documentation/Manual/upm-ui-giturl.html)
guide for details and troubleshooting.
1. Download `playtolia-sdk-X.Y.Z.tgz` from the
[Releases page](https://github.com/Playtolia/unity-sdk/releases).
2. In the Package Manager, click **`+` ▸ Add package from tarball…**
3. Select the downloaded `.tgz` and click **Open**.
Unity copies the archive into your project and resolves it in place. The tarball is
self-contained — it already includes the iOS `core.framework` — so it works without
network access once downloaded.
Unity references the tarball by its file path, not its contents. Keep the `.tgz`
somewhere stable inside or alongside your project (many teams commit it to a
`Packages/` subfolder). If you move or delete it, the package fails to resolve on the
next import. See Unity's
[Install from a local tarball](https://docs.unity3d.com/6000.0/Documentation/Manual/upm-ui-tarball.html)
guide.
## Native dependencies
The package pulls in its own platform dependencies — you don't add them by hand:
* **Android** — resolved from Maven Central by the
[External Dependency Manager for Unity (EDM4U)](https://github.com/googlesamples/unity-jar-resolver).
The package ships an `Editor/SharedAndroidDependencies.xml` pinned to the matching
`com.playtolia.sdk:core-android` version, and EDM4U downloads it at build time. EDM4U is a
transitive requirement; if your project doesn't already have it, install
`com.google.external-dependency-manager` alongside Playtolia.
* **iOS** — the `core.framework` binary ships inside the package and is embedded into your
Xcode project automatically by the included build post-processor.
## Verify the install
The package ships a **Smoke Test** sample that runs a minimal initialization and native
round-trip. In the Package Manager, select **Playtolia SDK ▸ Samples ▸ Smoke Test ▸
Import**, then open the imported scene/script to confirm the SDK loads and responds. This is
the same check CI runs, so if it passes, your install is wired correctly.
## Updating
* **Scoped registry** — the smooth path: the Package Manager shows a version list and a
one-click **Update** button whenever a newer version is published. Nothing to edit by hand.
Git-URL and tarball packages, by contrast, don't show an Update button — that UI is only for
packages from a registry. Unity pins the exact version you installed (in
`Packages/packages-lock.json`), so you move to a new release yourself:
* **Git URL** — bump the tag in `Packages/manifest.json` (e.g. `#v1.4.0` → `#v1.5.0`). Since
the URL changes, Unity re-resolves on the next window focus and updates the lock file. You
can also just re-run **`+` ▸ Add package from git URL…** with the new tag. (No manual lock
editing needed — that's only required if you track a moving branch instead of a tag.)
* **Tarball** — download the newer `.tgz`, remove the existing package from the Package
Manager, and add the new archive.
The package version always matches the `com.playtolia.sdk:core` library version, so package
`X.Y.Z` always pairs with core `X.Y.Z`.
## Next step
Add the Playtolia GameObject, configure your Game ID, and build for iOS and Android.
Then install the package: **Window ▸ Package Manager ▸ My Registries ▸ Playtolia ▸
Playtolia SDK ▸ Install** (or **`+` ▸ Add package by name…** → `com.playtolia.sdk`).
Add the same registry and the package to `Packages/manifest.json` (create the
`scopedRegistries` array if it isn't there):
```json theme={null}
{
"scopedRegistries": [
{
"name": "Playtolia",
"url": "https://dist.playtolia.com/unity-sdk",
"scopes": ["com.playtolia"]
}
],
"dependencies": {
"com.playtolia.sdk": "1.4.0"
}
}
```
Unlike a Git URL, a registry dependency uses normal version numbers (`"1.4.0"`), so the
Package Manager shows every available version and an **Update** button when a newer one
is published. This is the smoothest way to stay current. Grab the latest version number
from the [Releases page](https://github.com/Playtolia/unity-sdk/releases).
1. In the Package Manager, click **`+` ▸ Add package from git URL…**
2. Paste the repository URL with the version tag you want and click **Add**:
```
https://github.com/Playtolia/unity-sdk.git#vX.Y.Z
```
Replace `vX.Y.Z` with the version you want — grab the latest tag from the
[Releases page](https://github.com/Playtolia/unity-sdk/releases) (e.g. `#v1.4.0`). Unity
clones that tag and adds it to your project.
**Pin to a tag.** Git URLs don't support version ranges, and the package's C# is matched
to a specific iOS framework and Android (Maven) version — so a fixed `#vX.Y.Z` keeps all
three in sync and builds reproducible. Omitting the fragment resolves `main` at the
moment you add it and then locks that commit in `Packages/packages-lock.json`; it does
**not** auto-update, so a tag is clearer and safer.
You can also add the same line to `Packages/manifest.json` directly:
```json theme={null}
{
"dependencies": {
"com.playtolia.sdk": "https://github.com/Playtolia/unity-sdk.git#vX.Y.Z"
}
}
```
Installing from a Git URL requires a
[Git client](https://git-scm.com/) on your machine and on your `PATH` before you
launch Unity. See Unity's
[Install from a Git URL](https://docs.unity3d.com/6000.0/Documentation/Manual/upm-ui-giturl.html)
guide for details and troubleshooting.
1. Download `playtolia-sdk-X.Y.Z.tgz` from the
[Releases page](https://github.com/Playtolia/unity-sdk/releases).
2. In the Package Manager, click **`+` ▸ Add package from tarball…**
3. Select the downloaded `.tgz` and click **Open**.
Unity copies the archive into your project and resolves it in place. The tarball is
self-contained — it already includes the iOS `core.framework` — so it works without
network access once downloaded.
Unity references the tarball by its file path, not its contents. Keep the `.tgz`
somewhere stable inside or alongside your project (many teams commit it to a
`Packages/` subfolder). If you move or delete it, the package fails to resolve on the
next import. See Unity's
[Install from a local tarball](https://docs.unity3d.com/6000.0/Documentation/Manual/upm-ui-tarball.html)
guide.
## Native dependencies
The package pulls in its own platform dependencies — you don't add them by hand:
* **Android** — resolved from Maven Central by the
[External Dependency Manager for Unity (EDM4U)](https://github.com/googlesamples/unity-jar-resolver).
The package ships an `Editor/SharedAndroidDependencies.xml` pinned to the matching
`com.playtolia.sdk:core-android` version, and EDM4U downloads it at build time. EDM4U is a
transitive requirement; if your project doesn't already have it, install
`com.google.external-dependency-manager` alongside Playtolia.
* **iOS** — the `core.framework` binary ships inside the package and is embedded into your
Xcode project automatically by the included build post-processor.
## Verify the install
The package ships a **Smoke Test** sample that runs a minimal initialization and native
round-trip. In the Package Manager, select **Playtolia SDK ▸ Samples ▸ Smoke Test ▸
Import**, then open the imported scene/script to confirm the SDK loads and responds. This is
the same check CI runs, so if it passes, your install is wired correctly.
## Updating
* **Scoped registry** — the smooth path: the Package Manager shows a version list and a
one-click **Update** button whenever a newer version is published. Nothing to edit by hand.
Git-URL and tarball packages, by contrast, don't show an Update button — that UI is only for
packages from a registry. Unity pins the exact version you installed (in
`Packages/packages-lock.json`), so you move to a new release yourself:
* **Git URL** — bump the tag in `Packages/manifest.json` (e.g. `#v1.4.0` → `#v1.5.0`). Since
the URL changes, Unity re-resolves on the next window focus and updates the lock file. You
can also just re-run **`+` ▸ Add package from git URL…** with the new tag. (No manual lock
editing needed — that's only required if you track a moving branch instead of a tag.)
* **Tarball** — download the newer `.tgz`, remove the existing package from the Package
Manager, and add the new archive.
The package version always matches the `com.playtolia.sdk:core` library version, so package
`X.Y.Z` always pairs with core `X.Y.Z`.
## Next step
Add the Playtolia GameObject, configure your Game ID, and build for iOS and Android.